Saturday, 29 June 2013

Building the base for the jig

Today we built the base of the jig. Since we don't have  a level concrete floor in our yard, we had to make a level structure with accurate square angles to be able to put up the jig.

The work was made very easy with the DeWalt tools we just received. Those 3 inch screws went into that green wood as if through butter :D

Long afternoon of work but a good job done though we were slightly hampered by the rain. But we didnt allow our spirits to be dampened by the weather ;)

Bored at the rain causing spray onto our wood pile :D ....waiting for the weather to improve.

First testing of the DeWalt hammer drill. That machine is a beast :D 

Early evening. Almost done with wood work.

Takes barely 5 s to insert a 3inch screw into that wood with our hammer drill.

Job done. Base is perfectly level and square. Very strong construction.

Here's a demo of the machine for anyone interested to know a little bit more about our DeWalt hammer drill 

http://www.youtube.com/watch?v=WGXQfnWdwIc


Monday, 17 June 2013

Start of glueing work.

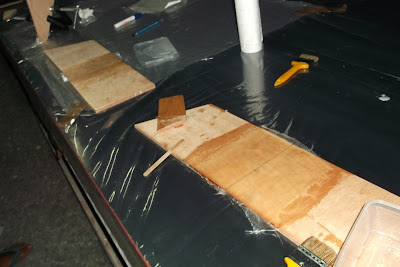
After placing all the wooden pieces in order for the gluing, we today started joining the wood parts to make the boat panels and we're going to be kept very busy with that for the coming weeks.

Here are some pictures of the parts that we glued together using epoxy and fiberglass and then sanded to a smooth finish.

We're using the Singapore Epoxy from Amro since we find it is more fluid and hence easier to work with and offers a longer pot-life that allows us to do more joints before having to mix new epoxy again.

For this kind of joint we're doing butt joints and using roving fiberglass of 400 g/m2. We also use a lot of plastic sheets since epoxy glue does not stick to plastic.

First we had to cut our fiberglass to the proper width for the joints we were going to make.

Rolling up very carefully.

Fixing the middle part firmly with small nails so that they would stay in place during epoxy-process.


Using the Singapore Epoxy.

Our kitchen-scale protected from glue.

plastic sheets used so that our wood dont get glued to the table.


Covered up everything to prevent humidity affecting out wood quality.


Two days later, we sanded the joints and did even more epoxy gluing. However, we didn't put fiberglass on both sides of the butt joints yet in order to retain more flexibility, lightness of material during working and so as not to create a too thick part along the panels when working with them(and also out of laziness of our part).

Sanding with our small drill that we bought.

We used a circular adapter to fix a circular sand paper to the drill.

sanded smooth.

Another joint, not yet sanded.


Car batteries used to weigh down wood during gluing.


Sunday, 16 June 2013

Wood for jig delivered home

The wood for the jig of the boat has come home today. We're going to be building the structure(called a jig) onto which we'll be placing the boat panels and bulkheads. We had already done the purchase and were awaiting delivery as we're nearing the end of the wood cutting process and the assembly is promising to be even more exciting.

We had to clamp the long wood bars together as they had some slight curves to them when they initially reached home.

Saturday, 15 June 2013

All wooden pieces ready for glueing.

These pictures were taken when we had just finished the cutting process and show the wooden parts that had been cut and were ready for gluing together with Epoxy.

Laid out for a photo shoot before gluing starts.

Lots and lots of wooden parts.

Everything carries an identification core so as to make assembly easier.

All arranged in the order in which they will be glued.

Friday, 14 June 2013

Break Test

Today we did our "Break Test" of our epoxy test pieces. We initially placed lots of old batteries onto the wood pieces. We had already placed about 85 kg of battery and the pieces was still not breaking :D
We kept adding until about 11 batteries were on it.


Tough Epoxy Joint :D


Pieces that went through the tests. Note the 
breaking is beyond the fibreglass.....not at the glued joints.


Monday, 10 June 2013

Testing our Epoxy Glue

Before applying the epoxy glue to our boat parts, we had to test them on some scrap material that we could easily throw away after test. We did just that today and also honed our skills to the work at hand so that when we're going to be doing it for the boat its not going to be the first time we're using epoxy and everything else.

Starting off with a normal piece of plywood. Not marine ones.

Numerous use of our G-Clamps

Our different epoxy that we're using. Small tins are from Europe. Big tins are from Singapore.

Adding the fiberglass to the glued joints.

A kitchen-scale specially purchased for those kind of work, used to weigh amounts of Epoxy.

Done. Now we wait for everything to dry.

Sunday, 9 June 2013

End of wood cutting process.

(Written by Sultan)
Today we officially finished the cutting of all of our wooden parts for the boat. My cousin Zaynah even came and assisted to the last piece of wood being cut with our Dremel Sawmax. We had to place the vacuum adapter to the saw in order not to kill my cousin as she's allergic to any form of dust.

After cutting was done we also set about measuring the dimensions of everyone to try and design a small toilet to place on the boat. That's because the original design does not include one and we're thinking of doing some modifications to the boat to include one for our own use.

Everything now need to be placed in the proper order in which they will be epoxy-glued together.

Saturday, 1 June 2013

Cutting with our Dremel Sawmax

Dad has been cutting a bulkhead using our Dremel Sawmax today. Extra protection was needed againts the dust and we used a small 240/110 transformer for the power of our tool since it was designed to be used in the US.
Protection Gear needed due to large amount of dust generated.

Note the small transformer on the table behind the Saw.